DIY Glasses Case: Free Printable Sewing Pattern and a No-Sew Felt Version
A soft, lined glasses sleeve is one of the easiest sewing projects there is: two rectangles of fabric, two of lining, and about an hour. Our free printable pattern includes a sewn version and a no-sew felt version.
Some pages may contain ads or labeled affiliate links. Disclosure.
A handmade glasses case makes a thoughtful gift, uses up fabric scraps, and lets you make a case in exactly the size and style you want. This guide gives you a free printable pattern, explains how to sew a lined sleeve step by step, and offers a no-sew felt version for kids, crafters without a machine, or anyone short on time.
One honest note before you start: a fabric sleeve protects glasses from scratches and light knocks, not from being crushed. It is ideal for a desk, nightstand, handbag or pocket. For a crowded backpack or travel, pair it with a hard case or choose one; our hard vs. soft guide explains the difference.
Download the free pattern
Download the printable pattern (PDF, 2 pages)
The PDF is two US Letter pages at actual size:
- Page 1: sewn lined sleeve. Piece A (outer and lining), Piece B (optional padding) and Piece C (optional closure tab).
- Page 2: no-sew felt sleeve. Piece D, a single piece you fold and glue or blanket-stitch.
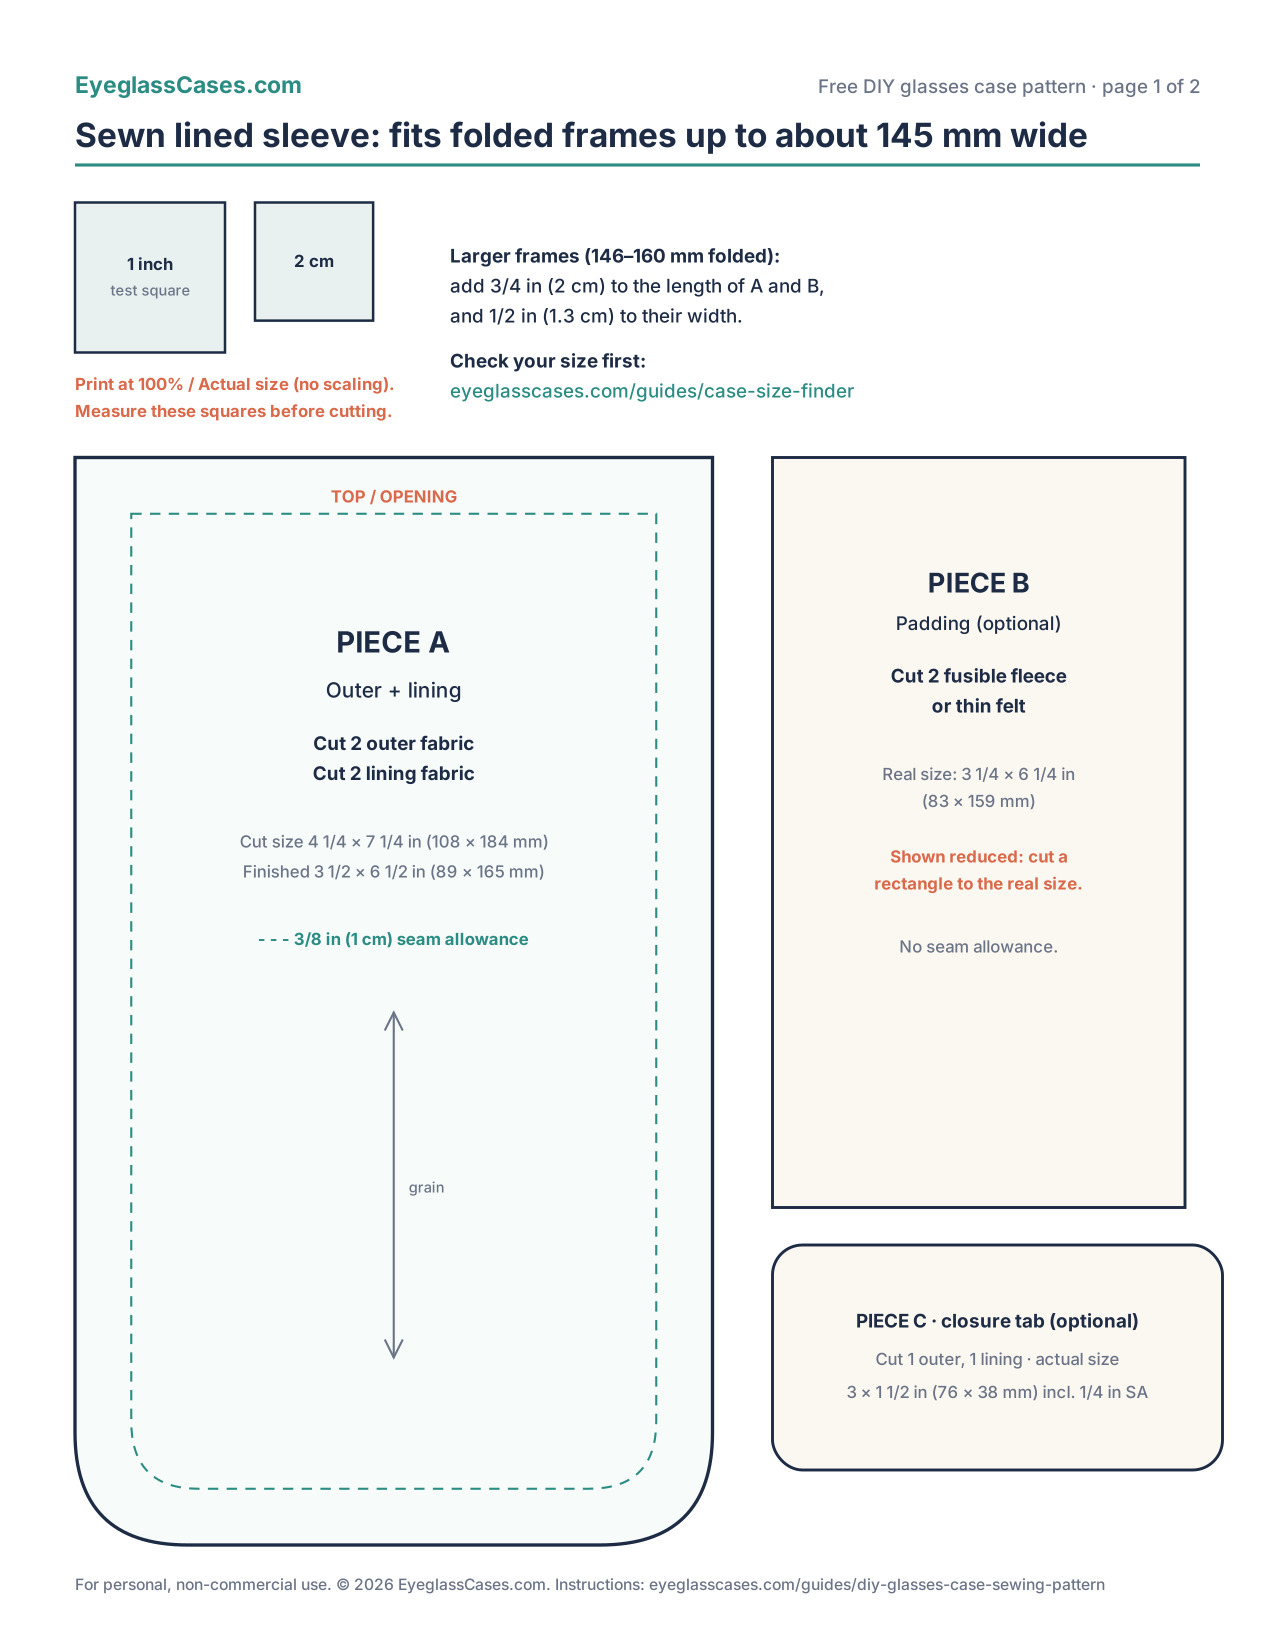
Print at 100% or "Actual size," not "Fit to page." Each page has a 1-inch and a 2-centimeter test square. Measure them with a ruler before cutting. If they are off, check your printer's scaling setting and print again.
Check the size first
The pattern's finished sleeve is about 3½ × 6½ inches (89 × 165 mm), which fits most folded glasses up to about 145 mm wide. That covers most small and medium prescription frames and reading glasses.
For larger frames, between about 146 and 160 mm folded, add ¾ inch (2 cm) to the length and ½ inch (1.3 cm) to the width of Pieces A and B. For very large or wraparound sunglasses, a sleeve may not be the best choice at all; see our guide to cases for oversized frames.
Not sure how big your glasses are? Fold them and measure hinge to hinge, or enter the size printed inside the temple arm into our case size finder.
Materials for the sewn version
| Item | Notes |
|---|---|
| Outer fabric | Quilting cotton, canvas, denim, corduroy, wool felt or upholstery fabric. Scraps are fine: you need two pieces about 4¼ × 7¼ in |
| Lining fabric | Soft and smooth is best for lenses: flannel, brushed cotton, minky or microfiber suede |
| Padding (optional) | Fusible fleece or thin felt, two pieces 3¼ × 6¼ in, for extra cushioning |
| Closure (optional) | A snap, a button and elastic loop, or a sew-on hook-and-loop dot |
| Thread, pins or clips | Matching all-purpose thread |
| Tools | Scissors or rotary cutter, ruler, iron, sewing machine or hand needle |
Lining tip: the lining touches your lenses every day, so avoid rough or heavily textured fabrics, sequins and anything that sheds. Pre-wash cotton fabrics so the case does not shrink later.
How to sew the lined sleeve
The pattern includes a ⅜-inch (1 cm) seam allowance, shown as a dashed line on Piece A.
- Cut the pieces. Cut two Piece A from outer fabric and two from lining. If using padding, cut two Piece B rectangles to the real size printed on the pattern (Piece B is drawn smaller to fit the page).
- Fuse the padding. Center a Piece B on the wrong side of each outer Piece A and fuse it with an iron, following the fleece manufacturer's instructions.
- Sew the outer pouch. Place the two outer pieces right sides together. Sew down one long side, around the rounded bottom and up the other long side, leaving the straight top open. Clip into the seam allowance around the curves, without cutting the stitches.
- Sew the lining pouch the same way, but leave a 2-inch gap in the middle of one side for turning.
- Optional tab. Sew Piece C outer and lining right sides together on three sides with a ¼-inch seam, turn, press, and add half of a snap. Baste it to the center top of the outer pouch's back, pointing down, raw edges matching.
- Join outer and lining. Turn the outer pouch right side out. Slide it inside the lining pouch (which is still wrong side out), so the right sides face each other. Line up the side seams and pin around the top edge.
- Sew the top edge all the way around.
- Turn it right side out through the gap in the lining. Gently push out the corners and curves.
- Close the gap in the lining with a few machine stitches near the edge or a hand ladder stitch.
- Finish. Push the lining down inside the outer pouch, press the top edge flat, and topstitch around the opening about ⅛ inch from the edge. Add the other half of the snap to the front if you made a tab.
That's it: a soft, lined sleeve in roughly an hour, faster once you have made one.
The no-sew felt version
Page 2 of the pattern is a single piece of stiff craft felt that folds into a sleeve with a flap.
- Cut Piece D from stiff felt about 2 to 3 mm thick. Thicker felt gives more structure.
- Fold the front half onto the back half along the dashed fold line.
- Apply fabric glue inside the shaded ¼-inch margins along the open side and bottom and press them together. Or, for a sturdier, decorative edge, join them with a blanket stitch in embroidery floss.
- Let the glue cure fully as directed on the glue label before using the case.
- Optional: add a snap or hook-and-loop dot so the flap stays closed.
The felt version is a good project for older children with supervision. Felt sleeves are softer on lenses than they look; just keep them away from heat and water, and brush off lint regularly.
Ideas to customize it
- Embroider initials on the outer fabric before sewing.
- Use a fabric scrap with meaning, such as an old shirt, a quilt remnant or a child's drawing printed on fabric.
- Add a key ring or wrist strap by basting a loop of ribbon into the side seam in step 3.
- Make a double sleeve by sewing a third lining layer down the middle to create two pockets. Size it for the larger pair.
- Add a microfiber lining, which also works as a quick lens wipe in a pinch.
Caring for a fabric case
Shake out the sleeve every week or so and use a lint roller inside. Wash cotton sleeves gently by hand in cool water with mild detergent and air-dry. Grit trapped in a lining is the main way soft cases cause scratches, so keeping it clean matters. Our guide to cleaning a glasses case has more detail.
Frequently asked questions
Is the glasses case pattern really free?
Yes. The PDF is free for personal, non-commercial use, including making cases as gifts.
What fabric is best for a glasses case lining?
Soft, smooth, low-lint fabrics such as flannel, brushed cotton, minky or microfiber suede.
Can I make a hard glasses case at home?
Hard shells need molded plastic or metal, which is hard to replicate at home. A padded fabric sleeve with fusible fleece is the practical DIY option; for crush protection, buy a hard case.
My pattern printed too small. What happened?
Your printer probably scaled the page. Choose "Actual size" or "100%" in the print dialog and check that the test square measures exactly 1 inch.
Bottom line
Download the pattern, print it at actual size, check your frame width, and choose either the lined sewn sleeve or the no-sew felt version. With a soft, smooth lining and a little care, a handmade case will protect a pair of glasses from everyday scratches for years.